A Minimum Privilege Guide to Domino Volumes on Azure with NetApp ONTAP
Authors
Yassine Maachi
Senior Solution Architect
Article topics
Domino Volumes, NetApp ONTAP, Azure storage, persistent storage, Cloud Volumes ONTAP, Trident CSI, DVNO, minimum privilege, AKS
Intended audience
Platform engineers and Domino admins (primary). IT infrastructure architects and Azure administrators responsible for AI platform storage (secondary)
Overview and goals
The challenge
AI and data science workloads need persistent, shared storage that survives across jobs, notebooks, and model training runs. On Azure, teams often reach for Azure Blob or Azure Disk, but neither provides the NFSv3/v4 (Network File System) semantics that Domino's volume and snapshot model requires. NetApp Cloud Volumes ONTAP (CVO) fills that gap. However, most deployment guides assume cluster-admin credentials, which enterprise security teams rarely grant.
The solution
Domino Volumes for NetApp ONTAP (DVNO) connects Domino's data plane to a NetApp CVO instance running in Azure, surfacing enterprise NFS storage, including full snapshot support, as first-class Domino Volumes. This blueprint walks through the end-to-end deployment using only a vsadmin (SVM-scoped) credential, meaning no cluster-admin access is required. The result is a production-ready persistent storage layer for AI workloads, governed by your existing Azure and ONTAP security posture.
When should you consider deploying DVNO on Azure?
Consider this approach when one or more of the following is true:
- You need persistent, shareable volumes for Domino workloads on AKS. Azure Blob doesn't provide NFS semantics; Azure Disk is single-node ReadWriteOnce. Domino Volumes require ReadWriteMany NFS mounts with snapshot capability.
- Your security policy prohibits cluster-admin credentials for storage integrations. DVNO works fully with a vsadmin (SVM-scoped) credential; it doesn't require cluster-level API access.
- You are running NetApp CVO in Azure and want to maximize its value. DVNO lets Domino provision, snapshot, and manage FlexVol volumes directly on your existing CVO investment.
- You need reproducible data snapshots for model training and experimentation. Domino Volumes with ONTAP snapshots let data scientists capture a dataset at a point in time and reuse it across runs without copying data.
What are the layers of the DVNO architecture?
The DVNO integration on Azure has three layers that communicate through standard APIs:
1. NetApp CVO (Azure): A single-node or HA (High Availability) Cloud Volumes ONTAP cluster deployed in the same Azure VNet as the AKS cluster. A dedicated Storage Virtual Machine (SVM) is the isolation unit. All Trident and Domino communication goes through the SVM management LIF, not the cluster management LIF; this distinction lets the entire integration run on a vsadmin credential alone.
2. Trident CSI (AKS): NetApp's Kubernetes storage driver, deployed in the trident namespace. A TridentBackendConfig points at the SVM management LIF, and a StorageClass exposes ONTAP NFS volumes as Kubernetes PVCs.
3. Domino: The data-plane-agent connects to Trident over its REST API. The remotefs service registers a Filesystem object backed by a root PVC imported from the SVM, then provisions and manages volumes and snapshots on behalf of Domino users.
Key networking note: Two LIFs serve distinct purposes. Trident uses the SVM management LIF for API authentication. The NFS data LIF is the mount target for pod volumes. Both must be reachable from AKS nodes and pods. This means the pod CIDR must be explicitly included in the ONTAP export policy when using Cilium or other CNIs that route NFS traffic using pod source IPs.
How to deploy DVNO on Azure
Step 1. Deploy BlueXP Connector and Cloud Volumes ONTAP
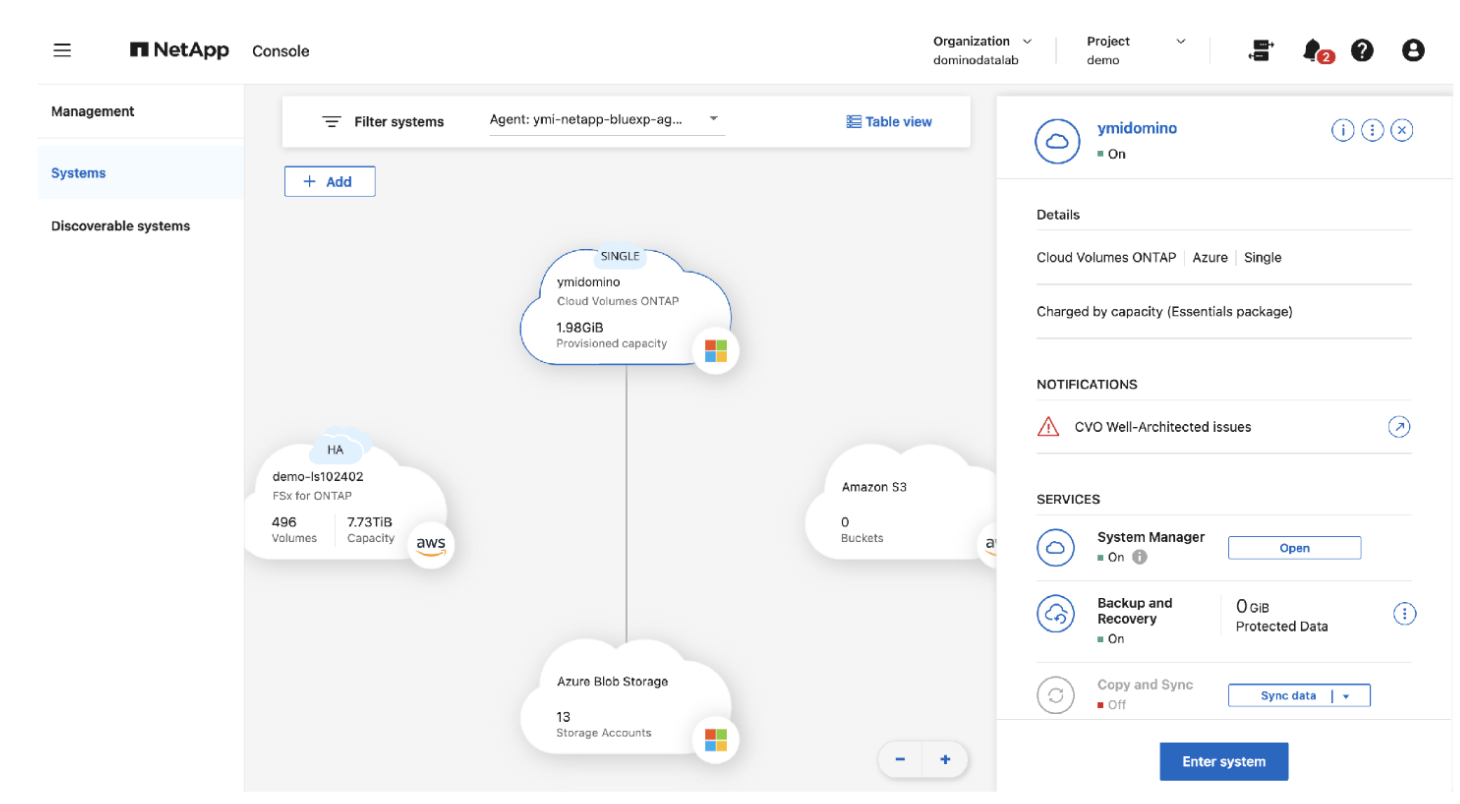
BlueXP is NetApp's control plane for CVO lifecycle management. Deploy a BlueXP Connector VM into the same Azure VNet as your AKS cluster. Once connected, create a new Cloud Volumes ONTAP working environment (single-node is sufficient for non-HA testing) in the same region, VNet, and subnet as AKS. After the CVO working environment shows On in the BlueXP Canvas, open ONTAP System Manager to configure the SVM.

Step 2. Configure the SVM management LIF
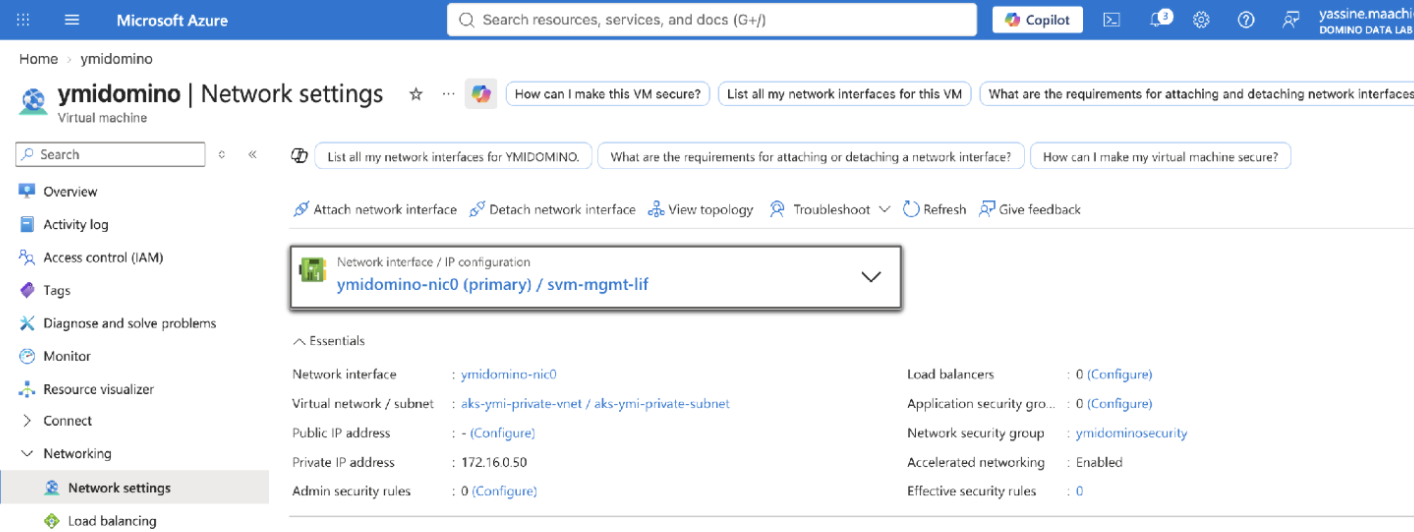
The order of operations here is critical and differs from on-premises ONTAP deployments. You must register the IP as a secondary static address on the CVO Azure NIC before creating the LIF in ONTAP. If you create the LIF first, Azure may assign that IP to another resource and the management endpoint becomes unreachable.
In the Azure Portal: Navigate to the CVO VM → Networking → the CVO NIC → IP configurations → + Add. Create a secondary static IP (e.g., 172.16.0.50) named svm-mgmt-lif.
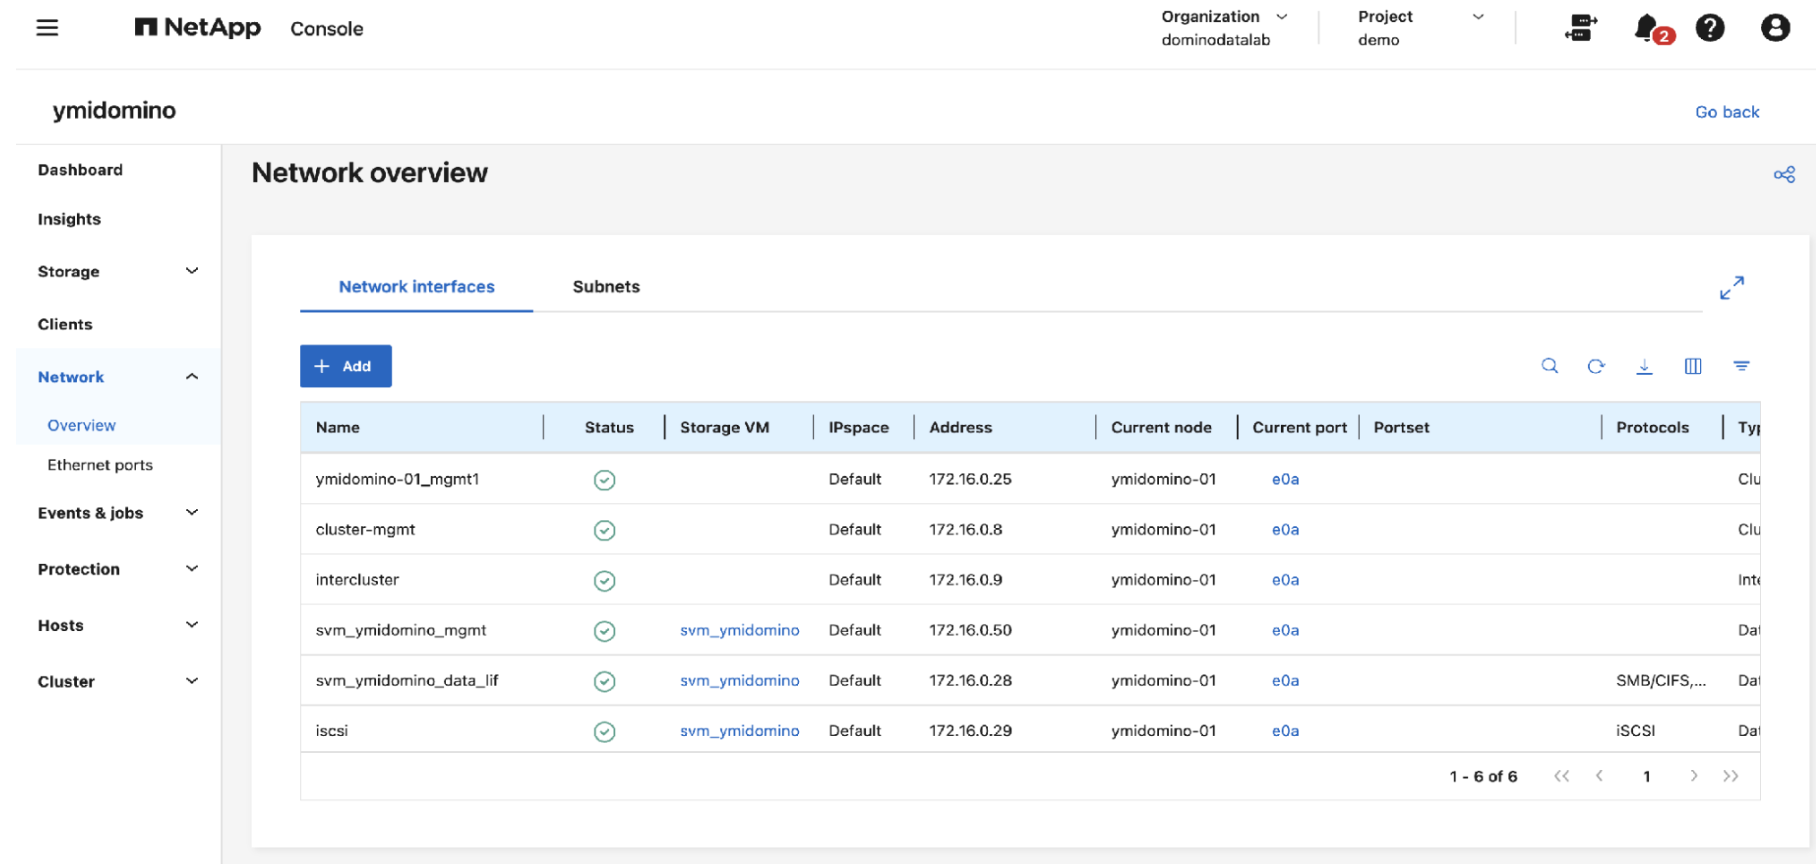
In ONTAP System Manager: Go to Network → Network Interfaces → + Add. Set the IP to the address just registered in Azure, the port to e0a, and the storage VM to your target SVM. Verify the interface shows a green status.
Step 3. Unlock vsadmin and create the export policy
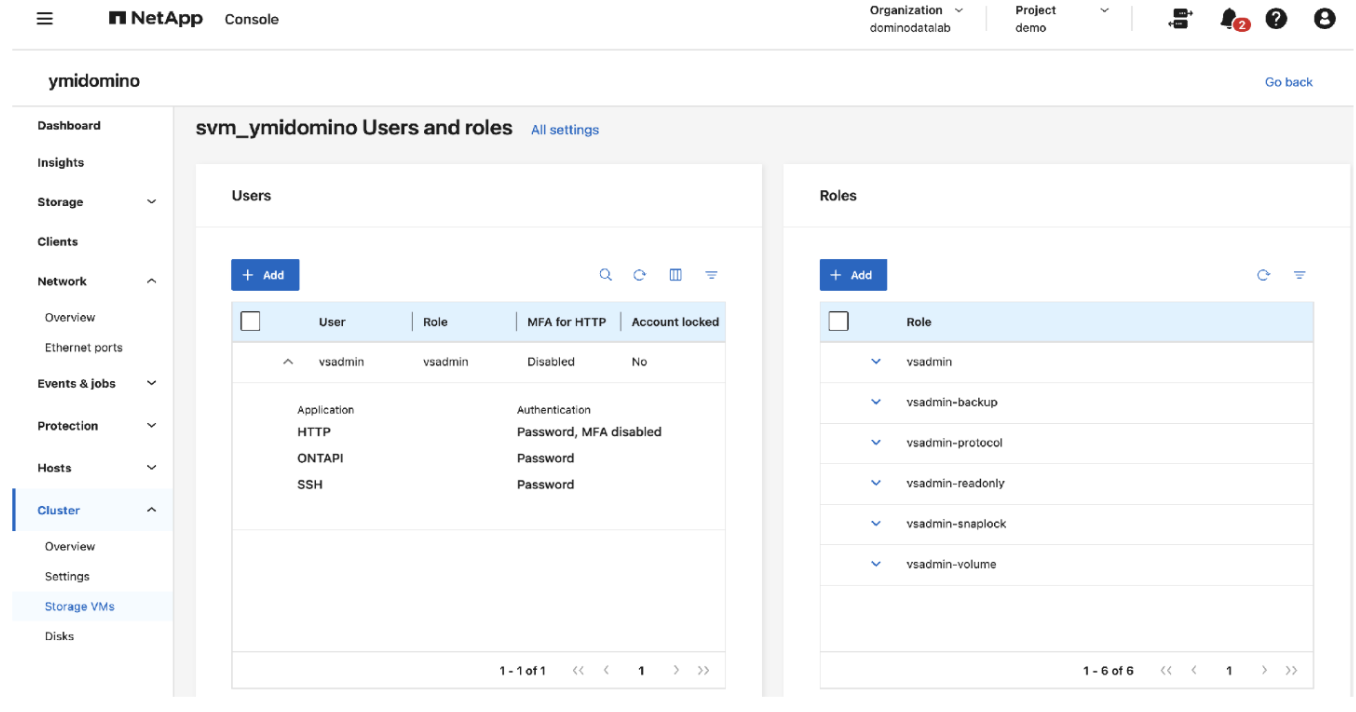
Unlock the SVM's vsadmin user in System Manager → Cluster → Storage VMs → [SVM] → Settings → Users and roles. Set a strong password and toggle the account to unlocked.
Because vsadmin is SVM-scoped, it cannot call GET /cluster/nodes. The endpoint Trident's autoExportPolicy: true uses to discover node IPs. With vsadmin, that call returns a 403, and Trident leaves every new volume on the tridentempty policy, blocking all NFS access. The fix is a manually created export policy covering both the AKS node subnet and the pod CIDR:
# Create the export policy
curl -k -s -X POST "https://<SVM_MGMT_LIF>/api/protocols/nfs/export-policies" \
  -u vsadmin:<password> \
  -H "Content-Type: application/json" \
  -d '{"name":"domino-export-policy","svm":{"name":"<SVM_NAME>"}}'

# Rule 1 — AKS node subnet
curl -k -s -X POST "https://<SVM_MGMT_LIF>/api/protocols/nfs/export-policies/<POLICY_ID>/rules" \
  -u vsadmin:<password> \
  -H "Content-Type: application/json" \
  -d '{"clients":[{"match":"172.16.0.0/16"}],"protocols":["nfs"],"ro_rule":["any"],"rw_rule":["any"],"superuser":["any"]}'

# Rule 2 — Pod CIDR (required for Cilium, Calico, and other CNIs)
curl -k -s -X POST "https://<SVM_MGMT_LIF>/api/protocols/nfs/export-policies/<POLICY_ID>/rules" \
  -u vsadmin:<password> \
  -H "Content-Type: application/json" \
  -d '{"clients":[{"match":"192.168.0.0/16"}],"protocols":["nfs"],"ro_rule":["any"],"rw_rule":["any"],"superuser":["any"]}'
Note: Confirm the pod CIDR for each environment; it varies by CNI and cluster configuration.
Step 4. Install Trident and create the backend
Install the Trident operator via Helm if not already present, then create a Kubernetes Secret with the vsadmin credentials and a TridentBackendConfig pointing at the SVM management LIF:
apiVersion: trident.netapp.io/v1
kind: TridentBackendConfig
metadata:
  name: cvo-domino-backend
  namespace: trident
spec:
  version: 1
  storageDriverName: ontap-nas
  backendName: cvo-domino
  managementLIF: 172.16.0.50       # SVM management LIF — NOT the cluster LIF
  dataLIF: 172.16.0.28             # NFS data LIF
  svm: svm_domino
  storagePrefix: trident
  autoExportPolicy: false          # Required with vsadmin
  exportPolicy: domino-export-policy
  credentials:
    name: cvo-domino-svm-secret
  defaults:
    snapshotDir: "true"            # Required for Domino snapshot browsing
    unixPermissions: "0777"        # Required: Domino WebVFS runs as UID 12574
    securityStyle: unix
snapshotPolicy: defaultkubectl get tbc -n trident
# NAME BACKEND NAME PHASE STATUS
# cvo-domino-backend cvo-domino Bound Success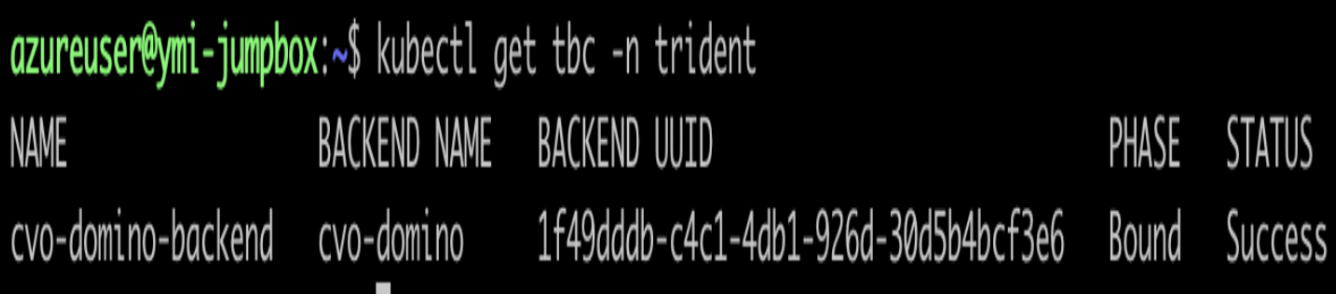
Then create a StorageClass (provisioner: csi.trident.netapp.io, reclaimPolicy: Retain) and import the SVM root volume as a root PVC in the domino-compute namespace using Trident's import annotations (trident.netapp.io/importBackendUUID and trident.netapp.io/importOriginalName).
Step 5. Configure Domino
Enable Trident in the data-plane-agent and increase call timeouts. The default 5-second Trident timeout is too short for CVO on Azure; note that volume operations require at least 120 seconds. Add the following to your Domino installer release_overrides:
release_overrides:
  data-plane-agent:
    chart_values:
      trident:
        enabled: true
      podEnv:
        - name: TRIDENT_CALL_TIMEOUT
          value: "120"
        - name: TRIDENT_READ_TIMEOUT
          value: "120"
Apply via the platform-operator and wait for data-plane-agent to redeploy. Then register the Filesystem in Domino: Manage Resources → NetApp Volumes → Filesystems → + Add Filesystem. Set the Kubernetes Root PVC to the imported root PVC and the Storage Class to your ONTAP storage class.
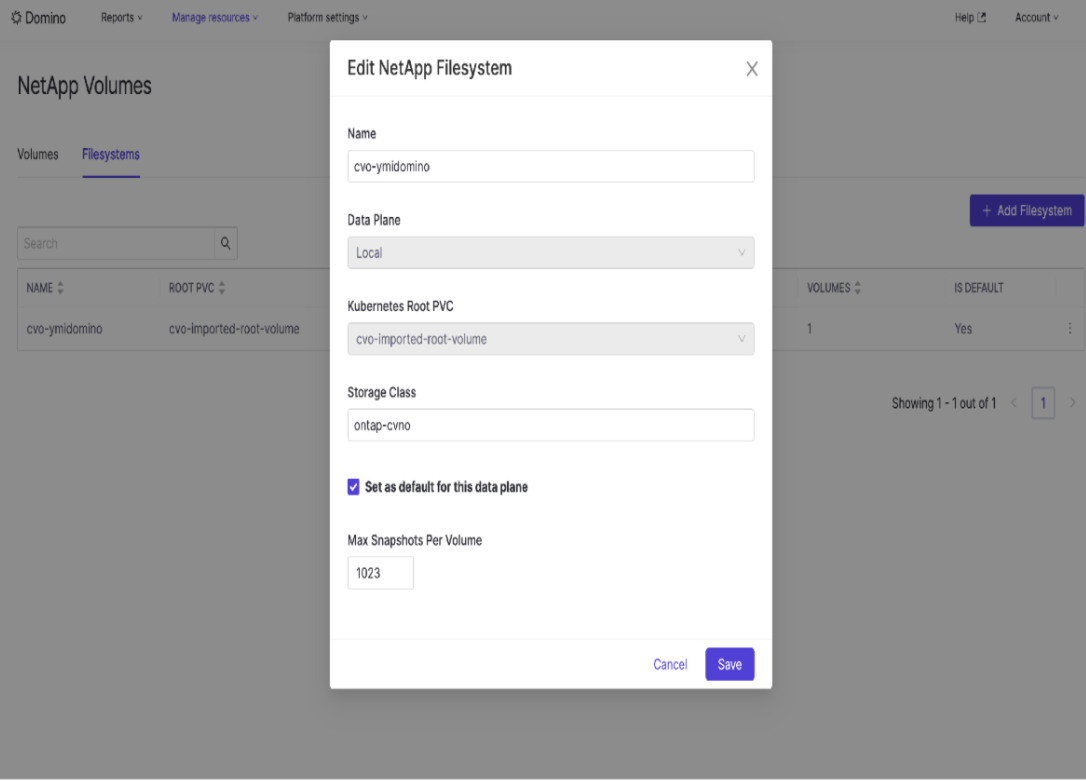
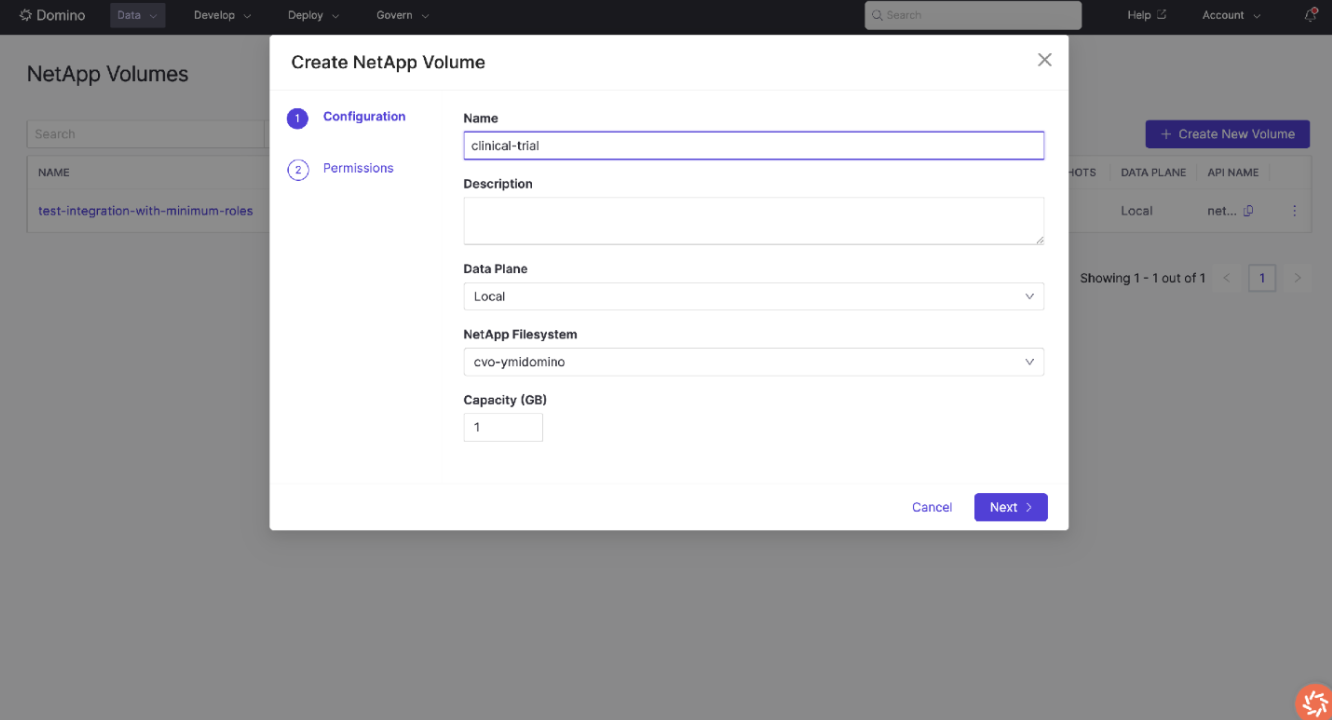
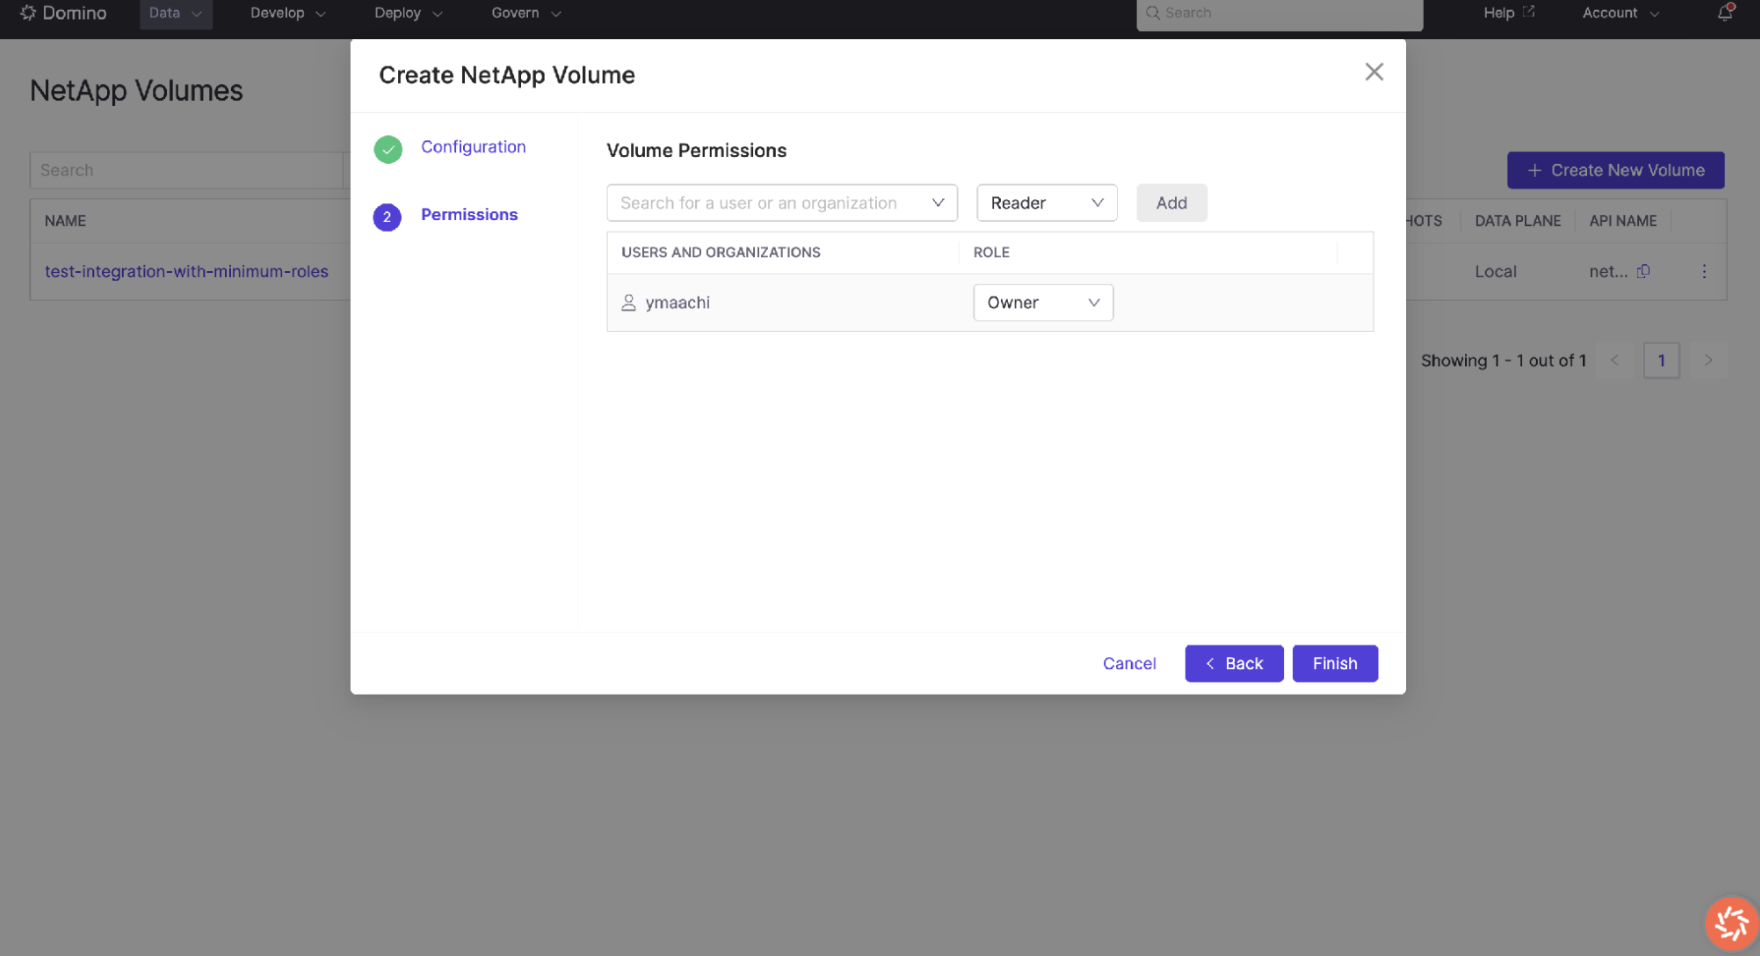
Once registered, data scientists can create volumes from Data → NetApp Volumes. The two-step wizard collects volume name, filesystem, and capacity (Configuration), then sets user and organization permissions (Permissions).
Verification
Once registered, validate end-to-end:
Check
Expected result
TridentBackendConfig
Phase: Bound, Status: Success
Root PVC
STATUS: Bound in domino-compute namespace
Filesystem registration
Appears in Domino admin panel with 0 volumes
Create a Domino Volume
Volume created without errors
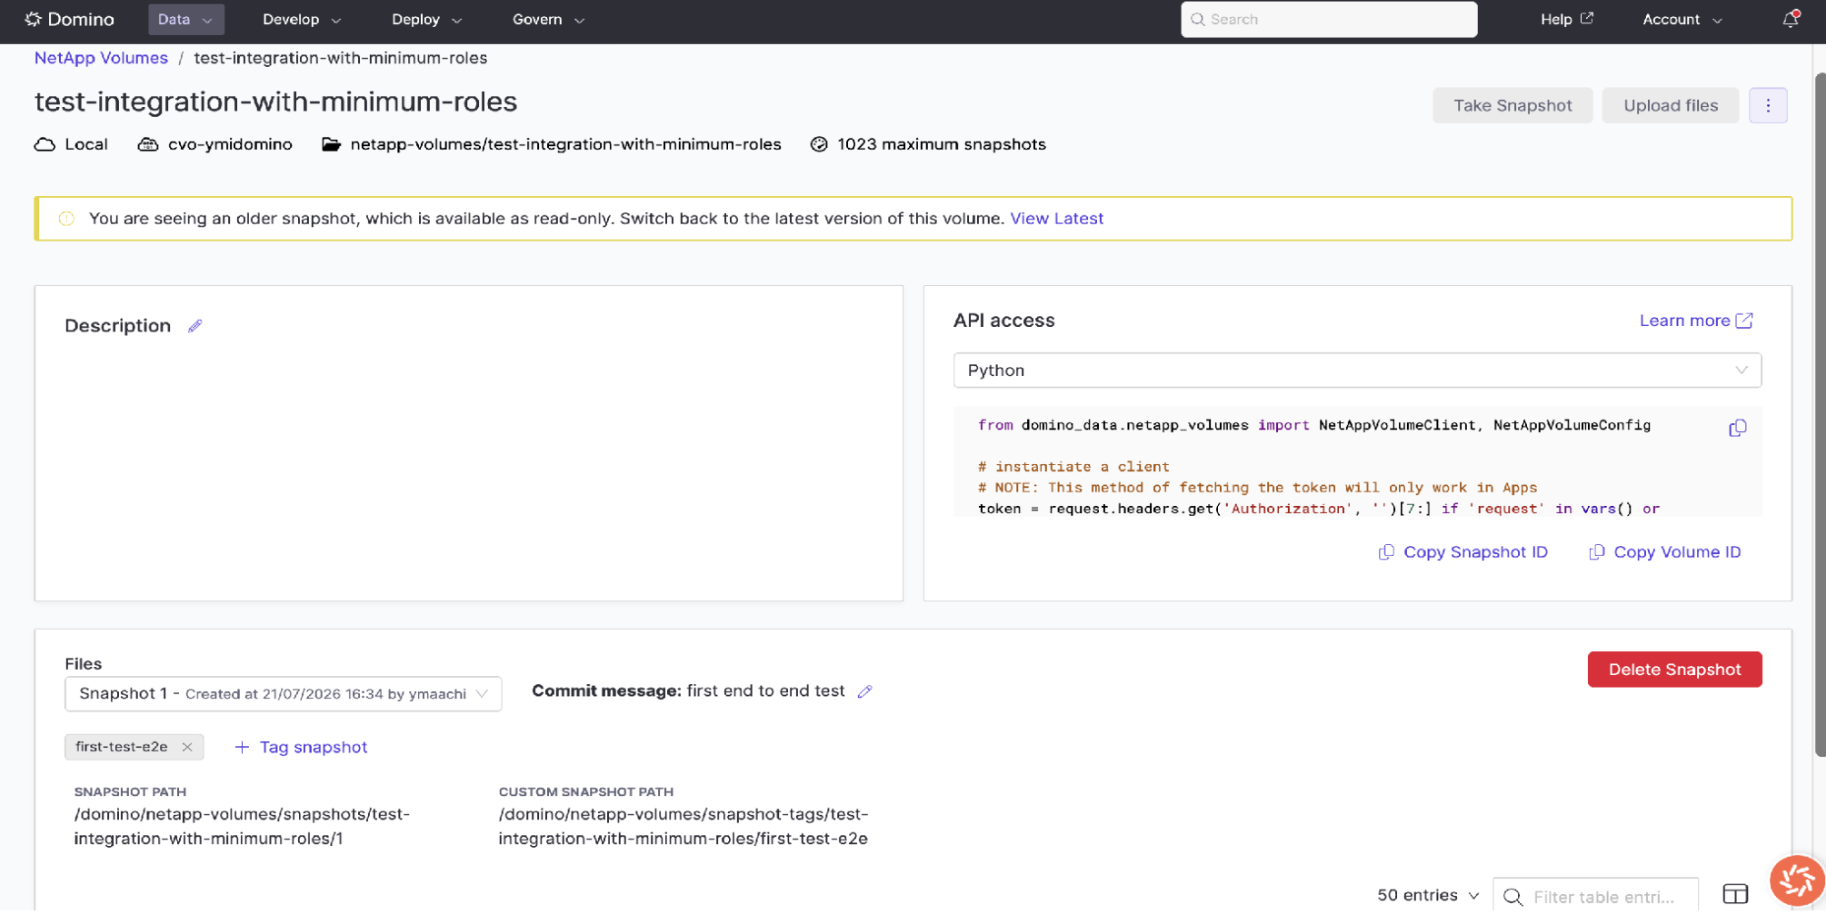
Upload files + Take Snapshot
Snapshot 1 created; files visible in snapshot browser
Two warnings are normal and expected with vsadmin — neither blocks functionality:
[GET /cluster/nodes][403]: node discovery is intentionally disabled; the manual export policy handles routing.Could not obtain aggregate info: aggregate metadata is inaccessible at SVM scope; NAS provisioning is unaffected.
vsadmin permission model
Operation
vsadmin
Impact
Authenticate via SVM management LIF
Core requirement — works
Create / resize / delete FlexVols
Volume lifecycle — works
Create / delete ONTAP snapshots
Snapshot feature — works
Manage NFS export policies on SVM
Manual domino-export-policy — works
Read volume metadata (size, path)
Required by Trident — works
Create UNIX users/groups on SVM
UID 12574 mapping — works
GET /cluster/nodes
403
autoExportPolicy disabled; manual policy used
GET /cluster/aggregates
403
Warning only; NAS provisioning unaffected
Cluster-level admin (fsxadmin)
Not required by Domino
Domino Volumes for NetApp CVO on Azure works fully with a vsadmin credential. Compared to a cluster-admin setup, two design adjustments are needed: use a manually managed export policy instead of autoExportPolicy, and include the pod network CIDR in that policy for CNIs that route NFS traffic using pod source IPs.
Where to go next
To learn more about Domino Volumes and persistent storage for AI workloads, visit the Domino Volumes documentation or contact your Domino Customer Success Manager or Solutions Engineer. For the full implementation runbook including edge cases, export policy details, and troubleshooting guidance, reach out to your Domino Professional Services team.
Domino professional services
From tailored strategies to full-scale implementations, the team acts as an extension of yours — speeding up time-to-value, mitigating risk, and enabling responsible scale across AI initiatives.


Yassine Maachi
Senior Solution Architect
Yassine works with enterprise customers to design and troubleshoot their Domino deployments across Azure, AWS, and GCP, with a focus on infrastructure and storage architecture. He has supported accounts on both cloud and on-prem setups.