Getting Started with Ray
Nikolay Manchev2022-10-20 | 12 min read
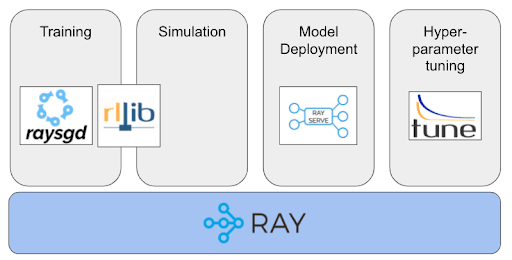
In this blog post we give a quick introduction to Ray. We talk about the architecture and execution model, and present some of Ray's core paradigms such as remote functions and actors.
In a previous blog post we talked about various frameworks for parallelising Python computations, and the importance of having the freedom to seamlessly move between Spark, Dask, and Ray. In this article, we expand on the topic by presenting a brief hands-on introduction to Ray and show how easy it is to get access to on-demand Ray clusters in Domino.
What is Ray?
Ray is a general framework that enables you to quickly parallelize existing Python code, but it is also talked about as a "framework for building frameworks". Indeed, there are a growing number of domain-specific libraries that work on top of Ray.
For example:
- RaySGD - a library for distributed deep learning, which provides wrappers around PyTorch and TensorFlow
- RLlib - a library for reinforcement learning, which also natively supports TensorFlow, TensorFlow Eager, and PyTorch
- RayServe - a scalable, model-serving library
- Ray Tune - a hyperparameter optimization framework, most commonly used for deep and reinforcement learning
Getting Access to Ray
Ray can be installed both locally and on a multi-node cluster. Local installation is a fairly straightforward process and provides an easy way of familiarising yourself with the framework. The official project documentation contains a comprehensive section about installing Ray on a single machine, which boils down to:
- Installing Ray via pip or via pulling a Docker image with Ray and all required dependencies
- Invoking ray start --head, which starts the runtime and provides the connection details. A sample output from a successfully started Ray instance looks similar to this:
Local node IP: 10.0.40.194--------------------Ray runtime started.--------------------Next steps To connect to this Ray runtime from another node, run ray start --address='10.0.40.194:6379' --redis-password='5241590000000000' Alternatively, use the following Python code: import ray ray.init(address='auto', _redis_password='5241590000000000') To connect to this Ray runtime from outside of the cluster, for example to connect to a remote cluster from your laptop directly, use the following Python code: import ray ray.init(address='ray://<head_node_ip_address>:10001') If connection fails, check your firewall settings and network configuration. To terminate the Ray runtime, run ray stop- Opening the Python REPL, JupyterLab, or whichever your preferred Python IDE is, and connecting to the runtime by starting a driver process on the same node as where you ran ray start.
Of course, where Ray shines is its capability to orchestrate and run code on multiple machines simultaneously. In a multi-node configuration, Ray operates a head node and a number of worker nodes.
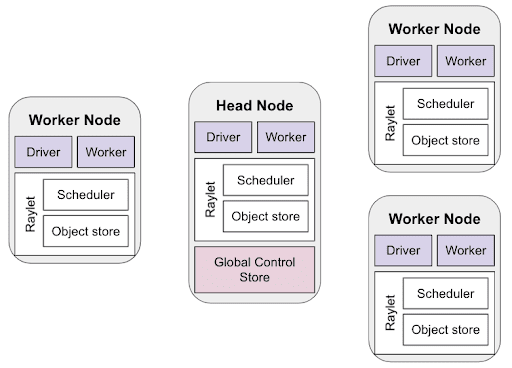
In this setup, the Head Node is started first, with the worker nodes given its address during startup so they form a cluster. Provisioning a Ray cluster has its own intricacies depending on the underlying infrastructure (Azure, AWS, GCP, on-prem etc.)
The Domino Enterprise MLOps platform supports on-demand Ray clusters, which can be provisioned using a simple GUI and without the need to drill down into infrastructure-related configuration tasks.
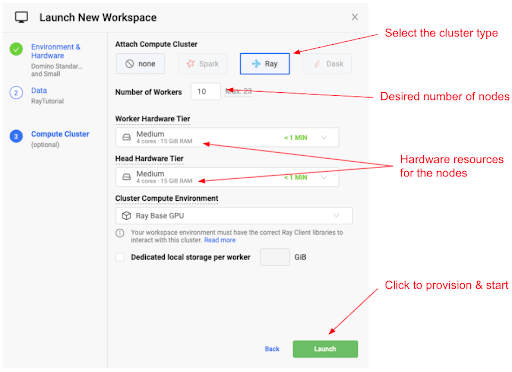
The screenshot above shows the simplicity of attaching an on-demand Ray cluster to your workspace of choice (e.g. JupterLab, VS Code, Zeppelin etc.)
Assuming that you now have access to Ray via a local or cloud installation, let’s see how to begin getting familiar with the framework.
Connecting to Ray
Local Ray
Once Ray is installed and running, our first task is to connect to the cluster. If this is a local install, we can just copy the Python code suggested in the ray start output.

The ray.init() command starts a driver process and connects it to the head that is already running on our local system. We can verify that Ray is initialized by calling ray.is_initialized():

Stopping Ray after we are done with it can be accomplished either by calling ray.shutdown() or via the command line:
ubuntu@run-61600c7b0f08e1652cfad481-p9bx8:/mnt$ ray stopStopped all 11 Ray processes.ubuntu@run-61600c7b0f08e1652cfad481-p9bx8:/mnt$Connecting to an On-Demand Ray Cluster
If we are using a proper, multi-node cluster provisioned by Domino on demand, we can connect to it using the following code:
import ray
import ray.util
import os
if ray.is_initialized() == False:
   service_host = os.environ["RAY_HEAD_SERVICE_HOST"]
   service_port = os.environ["RAY_HEAD_SERVICE_PORT"]
   ray.util.connect(f"{service_host}:{service_port}")
As you can see above, Domino automatically sets up environment variables that hold the information needed to connect to the cluster.
Domino also provides access to a dashboard (Web UI), which allows us to look at the cluster resources like CPU, Disk, and memory consumption
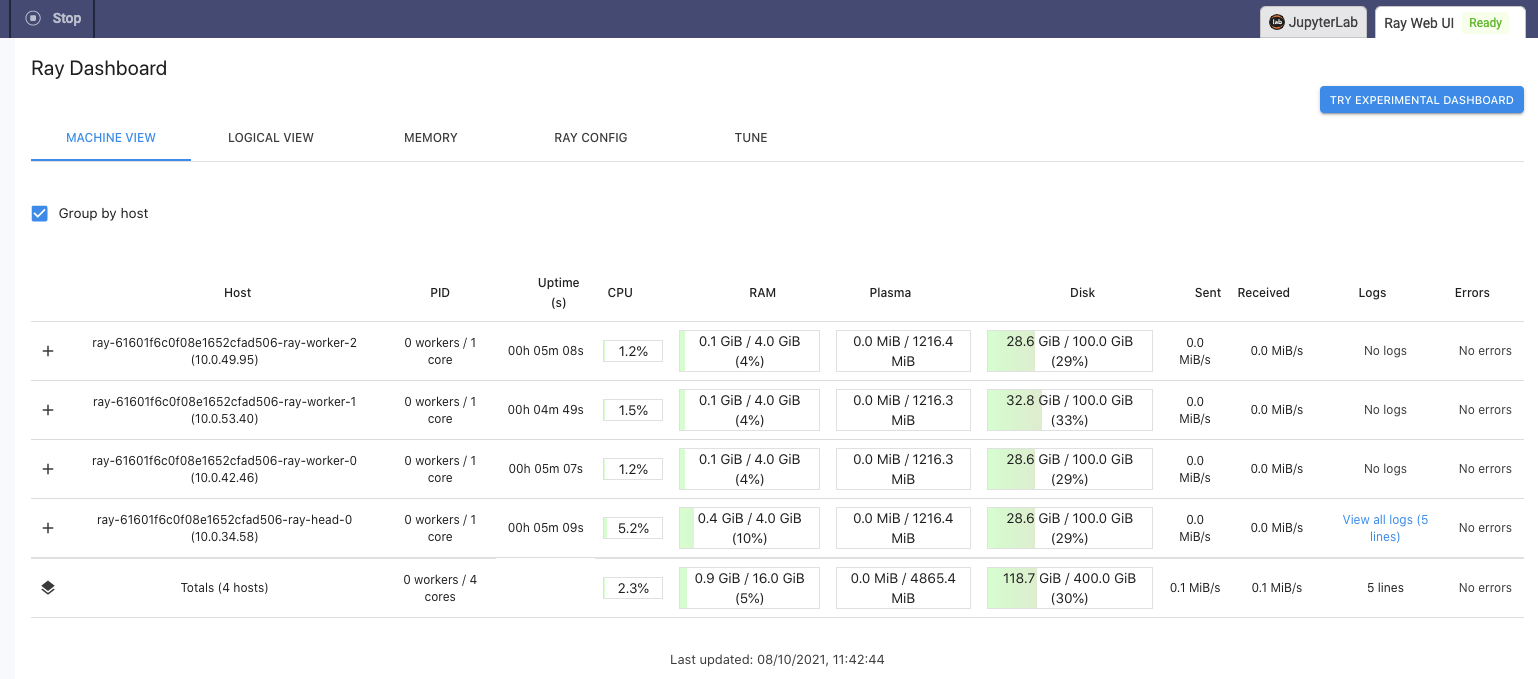
On workspace or job termination, the on-demand Ray cluster and all associated resources are automatically terminated and de-provisioned. This includes any compute resources and storage allocated for the cluster. On workspace or job startup, Domino automatically provisions and starts the Ray cluster with the desired cluster settings, and attaches it to the workspace or job as soon as the cluster becomes available.
First Steps with Ray
Ray enables us to execute standard Python functions asynchronously by turning them into Ray tasks (also called Remote Functions). This is a very straightforward process, which we can demonstrate by looking at a very simple example.
Let's start by writing a basic sinking sort function, which by definition is not the most efficient approach to sorting, to say the least.
def bubble_sort(to_sort):
    n = len(to_sort)
    for i in range(n):
        for j in range(n - 1):
            if to_sort[j] > to_sort[j+1]:
                to_sort[j], to_sort[j+1] = to_sort[j+1], to_sort[j]
We can then generate a list of 3,000 random integers in the [1; 1,000,000] range and pass it to the bubble_sort function. We can time the execution as the cumulative elapsed real-time over 20 runs like this:
start_time = time.time()
[bubble_sort(random.sample(range(1, 1000000), 3000)) for _ in range(20)]
print("--- %s seconds ---" % (time.time() - start_time))
Let's see how long it normally takes for bubble_sort to complete the sorting using Python and the local CPUs. In this case, our system has access to 8 CPU cores:
--- 22.029696702957153 seconds ---It appears that the wall clock for 20 runs of bubble_sort is about 22 seconds.
Now let's see if Ray can improve on this run time. The only thing we need to do to convert our bubble_sort function into a Ray task is to apply the @ray.remote decorator to it. Let's create an equivalent copy so that we still have the original intact in case we need it later. We'll name the new function bubble_sort_remote, and besides the new decorator we'll leave it 100% identical to bubble_sort:
@ray.remote
def bubble_sort_remote(to_sort):
    n = len(to_sort)
    for i in range(n):
        for j in range(n - 1):
            if to_sort[j] > to_sort[j+1]:
                to_sort[j], to_sort[j+1] = to_sort[j+1], to_sort[j]
To invoke the above remote function we need to use the remote method. This immediately creates an object reference (obj_ref) and a Ray task that will be executed on a worker process. The result of the execution can be retrieved by calling ray.get(obj_ref). The modified execution and timing code should therefore look like this:
start_time = time.time()
ray.get([bubble_sort_remote.remote(random.sample(range(1, 1000000), 3000)) for _ in range(20)])
print("--- %s seconds ---" % (time.time() - start_time))--- 6.814101696014404 seconds ---It appears the workload now takes about seven seconds. A three-fold improvement compared to what we had with a single-node Python.
Being a Domino cluster we also have access to the Web UI so we can inspect the resource utilisation across the cluster nodes while it is running the remote bubble sort method.
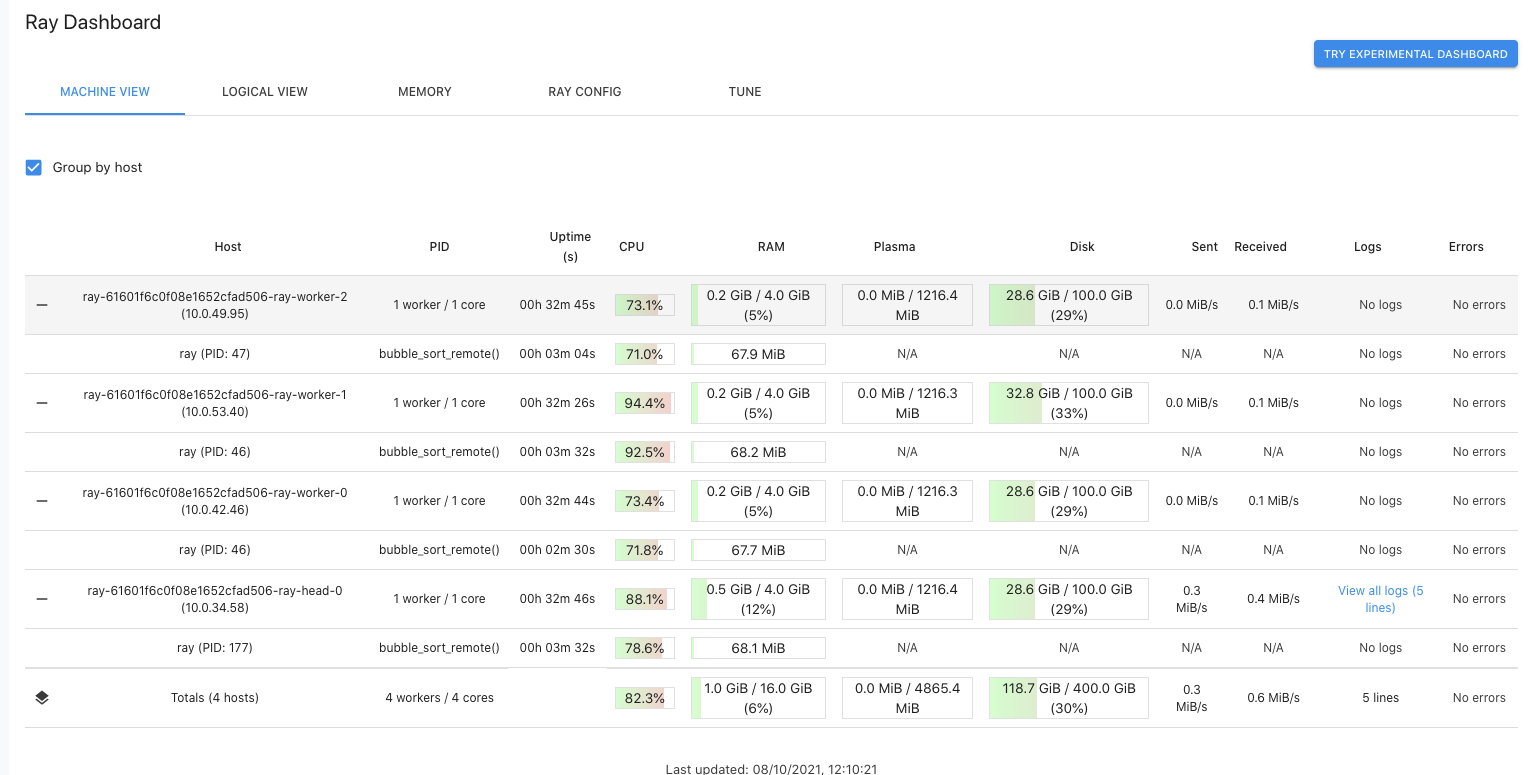
We can confirm that all cluster nodes are being used simultaneously, and this is the key to the speed-up provided by Ray. Because the individual Ray tasks are treated asynchronous, Ray can schedule and run them independently. In contrast, the pure-Python methods run one after the other as part of the list comprehension statement.
Note, that despite being asynchronous in nature, Ray tasks can still be dependent on other tasks. We could, for example, modify the call to bubble_sort_remote in the following way:
@ray.remote
def random_list(n=3000):
    return random.sample(range(1, 1000000), n)

start_time = time.time()
ray.get([bubble_sort_remote.remote(random_list.remote()) for _ in range(20)])
print("--- %s seconds ---" % ((time.time() - start_time)))
In this case, the random list creation is refactored into a separate Ray task, which is nested within the bubble_sort_remote call. Ray handles these situations transparently by building an internal dependency graph, so there is nothing special that we need to take care of. Just be mindful that in situations like this the actual sorting won't be executed before the random_list task has finished executing. This is generally the case for tasks that depend on each other.
In addition, the observant reader may ask, "Wait, I thought calling a Ray task returns an object reference, not the actual object. Don't I need to call ray.get() and pass that to bubble_sort_remote.remote?" The answer is no; Ray does this step for us.
A Brief Introduction to Actors
So far we have looked at how to transform simple Python functions into Ray tasks. Actors further extend the API to Python classes. Similar to the transformation of functions, decorating a Python class with @ray.remote transforms it into a stateful actor. Every instance of a class decorated with @ray.remote results in a new process (actor) that Ray starts somewhere on the cluster. Every call to an instance method is executed as a Ray task, which can mutate the state of the actor.
Let's look at an example. Here is a simple class that implements our sinking sort algorithm:
@ray.remote
class Bubble_Remote(object):

    def __init__(self):
      self.to_sort = self.shuffle()

    def shuffle(self):
        return random.sample(range(1, 1000000), 3000)

    def sort(self):
        n = len(self.to_sort)
        for i in range(n):
            for j in range(n - 1):
                if self.to_sort[j] > self.to_sort[j+1]:
                    self.to_sort[j], self.to_sort[j+1] = self.to_sort[j+1], self.to_sort[j]

    def get_value(self):
        return self.to_sort
As you can see above, besides the decorator, there is nothing special about the class. The class encapsulates our bubble_sort method, a shuffle method that randomly initialises the to_sort class member, and one getter method for retrieving the sorted list. The latter is needed because we can't read fields in Ray actors directly.
Using the code above is pretty straightforward, but pay attention to how the class is being instantiated:
bubble_remote = Bubble_Remote.remote()
print("Unsorted:", ray.get(bubble_remote.get_value.remote())[:10])
start_time = time.time()
bubble_remote.sort.remote()
print("Sorted:", ray.get(bubble_remote.get_value.remote())[:10])
print("--- %s seconds ---" % ((time.time() - start_time)))Unsorted: [616716, 419779, 57565, 782118, 577401, 61843, 102215, 499268, 287925, 57212]Sorted: [124, 175, 1603, 1909, 2280, 2424, 2896, 2990, 3235, 3398]--- 1.17197277545928955 seconds ---What about parallelisation? Let's do another 20 runs of shuffling and sorting, and check the wall clock.
start_time = time.time()
for _ in range(20):
    bubble.remote.shuffle.remote()
    ray.get(bubble_remote.sort.remote())
print("--- %s seconds ---" % ((time.time() - start_time)))--- 24.30797028541565 seconds ---OK, it appears that this is as slow as a normal single-threaded Python execution. This is because methods called on the same actor are executed serially in the order that they are called. Remember that actors are stateful, so Ray can't allow multiple remote functions to change class members out of order. This behaviour may look disappointing at first, but keep the following in mind:
- methods on different actors are executed in parallel
- actor handles can be passed to remote functions and other actors, and they can call each other
The above properties enable us to design highly complex execution graphs with a substantial degree of parallelism. Here is an example from the official Ray documentation that illustrates building a tree of actors:
@ray.remote(num_cpus=1)
class Worker:
    def work(self):
        return "done"

@ray.remote(num_cpus=1)
class Supervisor:
    def __init__(self):
        self.workers = [Worker.remote() for _ in range(3)]
    def work(self):
        return ray.get([w.work.remote() for w in self.workers])

ray.init()
sup = Supervisor.remote()
print(ray.get(sup.work.remote()))  # outputs ['done', 'done', 'done']
In the code above you see a Supervisor class that manages a number of Workers. This can be useful if you want to train a number of models (three in this case) in parallel. Another benefit of this setup is that a single call to the Supervisor triggers the instantiation of multiple workers and that the supervisor is able to inspect and modify the state of the workers at any given time. Note that, in terms of dependencies and actors calling each other, you can go deeper than the two-level Supervisor/Worker structure shown here.
Summary
In this blog post, we looked at Ray - a general parallelization framework for Python that can accelerate computation-heavy workloads with minimal code modifications. We showed the two main paradigms used by the framework - remote functions and actors, and demonstrated how Ray can be used on a single machine or a multi-node distributed cluster.
To learn more about Ray, visit the official Ray documentation. Additional details can be found in the Domino Enterprise MLOps Platform Documentation - On-Demand Ray Overview. You may also be interested in the various integrations like Distributed scikit-learn, Dask on Ray, Apache Airflow provider for Ray, and many others.
Nikolay Manchev is a former Principal Data Scientist for EMEA at Domino Data Lab. In this role, Nikolay helped clients from a wide range of industries tackle challenging machine learning use-cases and successfully integrate predictive analytics in their domain-specific workflows. He holds an MSc in Software Technologies, an MSc in Data Science, and is currently undertaking postgraduate research at King's College London. His area of expertise is Machine Learning and Data Science, and his research interests are in neural networks and computational neurobiology.


