Parallel computing with Dask: a step-by-step tutorial
Gourav Singh Bais2023-06-22 | 15 min read

It’s now normal for computational power to be improved continuously over time. Monthly, or at times even weekly, new devices are being created with better features and increased processing power. However, these enhancements require intensive hardware resources. The question then is, Are you able to use all the computational resources that a device provides? In most cases, the answer is no, and you’ll get an out of memory error. But how can you make use of all the computational resources without changing the underlying architecture of your project?
This is where Dask comes in.
In many ML use cases, you have to deal with enormous data sets, and you can’t work on these without the use of parallel computation, since the entire data set can’t be processed in one iteration. Dask helps you load large data sets for both data preprocessing and model building. In this article, you’ll learn more about Dask and how it helps in parallelization.
What is Dask?
When developers work on small data sets, they can perform any task. However, as the data increases, it sometimes can’t fit into the memory of a single machine anymore.
Dask is an open source Python library that provides efficient parallelization in ML and data analytics. With the help of Dask, you can easily scale a wide array of ML solutions and configure your project to use most of the available computational power.
Dask helps developers scale their entire Python ecosystem, and it can work with your laptop or a container cluster. Dask is a one-stop solution for larger-than-memory data sets, as it provides multicore and distributed parallel execution. It also provides a general implementation for different concepts in programming.
In Python, libraries like pandas, NumPy, and scikit-learn are often used to read the data sets and create models. All these libraries have the same issue: they can’t manage larger-than-memory data sets, which is where Dask comes in.
Unlike Apache Hadoop or Apache Spark, where you need to change your entire ecosystem to load data sets and train ML models, Dask can easily be incorporated with these libraries and enables them to leverage parallel computing.
The best part is that you don’t need to rewrite your entire codebase, you just have to enable parallel computing with minimal modifications based on your use cases.
Differences between a Dask DataFrame and a pandas DataFrame
A DataFrame is a tabular representation of data where information is stored in rows and columns. pandas and Dask are two libraries that are used to read these DataFrames.
pandas is a Python library that is used to read data from different files–in CSV, TSV, and Excel, for example–into DataFrames. It operates best with relatively small amounts of data. If you have a large amount of data, you’ll receive an out of memory (OOM) error.
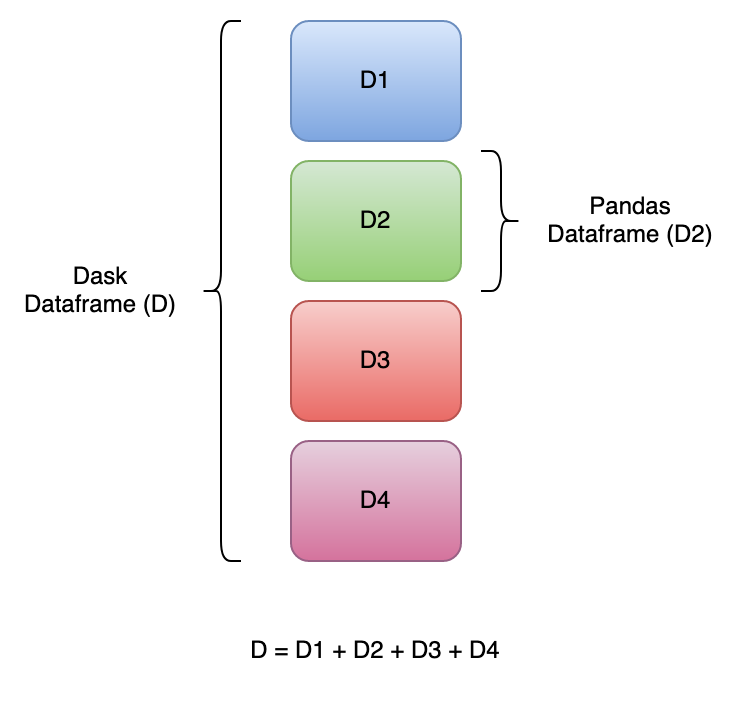
To solve the OOM error and enable parallel execution, the Dask library can be used to read large data sets that pandas can’t handle. A Dask DataFrame is a collection of different pandas DataFrames that are split along an index:

When you read data using a Dask DataFrame, multiple small pandas DataFrames are created, split along an index, and then stored on disk (if memory is limited). When you apply any operation on the Dask DataFrame, that operation is triggered for all the DataFrames stored on disk.
Use cases of Dask
Dask DataFrames can be used for all kinds of use cases, including the following:
- Parallelizing data science apps: to achieve parallelism in any data science and ML solution, Dask is the preferred choice because parallelism is not limited to a single application. You can also parallelize multiple applications on the same hardware/cluster. Because Dask enables apps to utilize the entire available hardware, different applications can run in parallel without issues caused by resource contention.
- Image processing: this requires an ample amount of hardware resources. If you’re using the traditional approach with pandas or NumPy, you might end up suspending the project since these libraries/tools can’t perform multiprocessing. Dask helps you read the data on multiple cores and allows the processing through parallelism.
For more information on different real-world use cases, check out the Dask Use Cases page on the Dask Stories documentation.
Dask implementation
To implement Dask, you need to ensure that you have Python installed in your system. If you don’t, download and install it now. Make sure you install a version newer than 3.7. (3.10 is the latest).
Package installation
As previously stated, Dask is a Python library and can be installed in the same fashion as other Python libraries. To install a package in your system, you can use the Python package manager pip and write the following commands:
## install dask with command prompt
pip install dask

## install dask with jupyter notebook

! pip install dask
Configuration
When you’ve finished installing Dask, you’re ready to use it with the default configuration (which works in the majority of instances). In this tutorial, you won’t need to explicitly change or configure anything, but if you want to configure Dask, you can review this Configuration document.
Parallelization preparation
To start, look at a simple code for calculating the sum of the square of two numbers. For this, you need to create two different functions: one for calculating the square of the numbers and the other for calculating the sum of squared numbers:
## import dependencies
from time import sleep
## calculate square of a number

def calculate_square(x):
    sleep(1)
    x= x**2
    return x

## calculate sum of two numbers
def get_sum(a,b):
    sleep(1)
    return a+b
The calculate_square() function takes a number as input and returns the square of that number. The get_sum() function takes two numbers as input and returns the sum of those two numbers. A delay of one second is intentionally added because it helps you notice the significant difference in the execution time with and without Dask. Now, take a look at the execution time of this logic without using Dask:
%%time
## call functions sequentially, one after the other

## calculate square of first number
x = calculate_square(10)

## calculate square of second number
y = calculate_square(20)

## calculate sum of two numbers
z = get_sum(x,y)
print(z)
The previous code calculates the square of numbers and stores them in variables x and y. Then the sum of x and y is calculated and printed. The %%time command is used to calculate the CPU time and wall time taken by the functions to execute. Now you should have an output like this:

You may notice that even after the intentional delay of three seconds, the entire code took 3.1 seconds to run.
Now it’s time to see how Dask can help in parallelizing this code (initial functions for calculating the square and sum would remain the same).
To begin, you need to import a Python Dask dependency named delayed that is used to achieve the parallelization:
## import dask dependencies
import dask
from dask import delayed
After importing the Dask dependency, it’s time to use it for executing multiple jobs at a time:
%%time
## Wrapping the function calls using dask.delayed
x = delayed(calculate_square)(10)
y = delayed(calculate_square)(20)
z = delayed(get_sum)(x, y)
print(z)
In this code snippet, you wrap your normal Python functions/methods to the delayed function using the Dask delayed function, and you should now have an output that looks like this:

You may notice that z does not give you the answer. This is due to the fact that in this instance, z is considered a lazy object of the delayed function. It holds everything that you need to compute the final results, including different functions and their respective inputs. To get the result, you must call the compute() method.
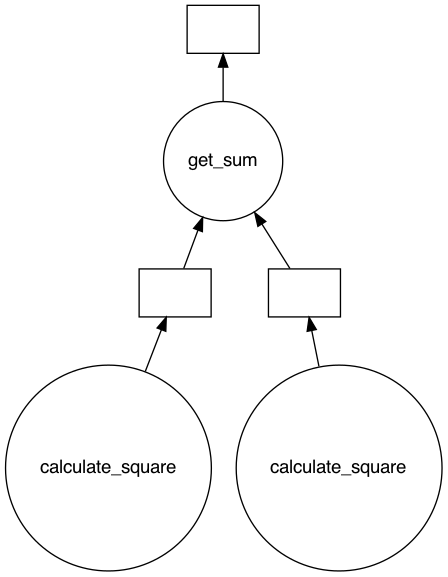
However, before calling the compute() method, check what the parallel execution will look like using the visualize() method:
%%time
## visualize the task graph
z.visualize()
Please note: If you face any error in visualizing the graph, there might be a dependency issue. You must install Graphviz to visualize any graph. You can do this with pip install graphviz.The executions graph should look like this:

%%time
## get the result using compute method
z.compute()
To see the output, you need to call the compute() method:

You may notice a time difference of one second in the results. This is because the calculate_square() method is parallelized (visualized in the previous graph). One of the benefits of Dask is that you don’t need to define the order of execution of different methods or define what methods to parallelize. Dask does that for you.
To further understand parallelization, take a look at how the delayed() method can be extended to Python loops:
## Call above functions in a for loop
output = []
## iterate over values and calculate the sum
for i in range(5):
    a = delayed(calculate_square)(i)
    b = delayed(calculate_square)(i+10)
    c = delayed(get_sum)(a, b)
    output.append(c)
total = dask.delayed(sum)(output)
## Visualizing the graph
total.visualize()
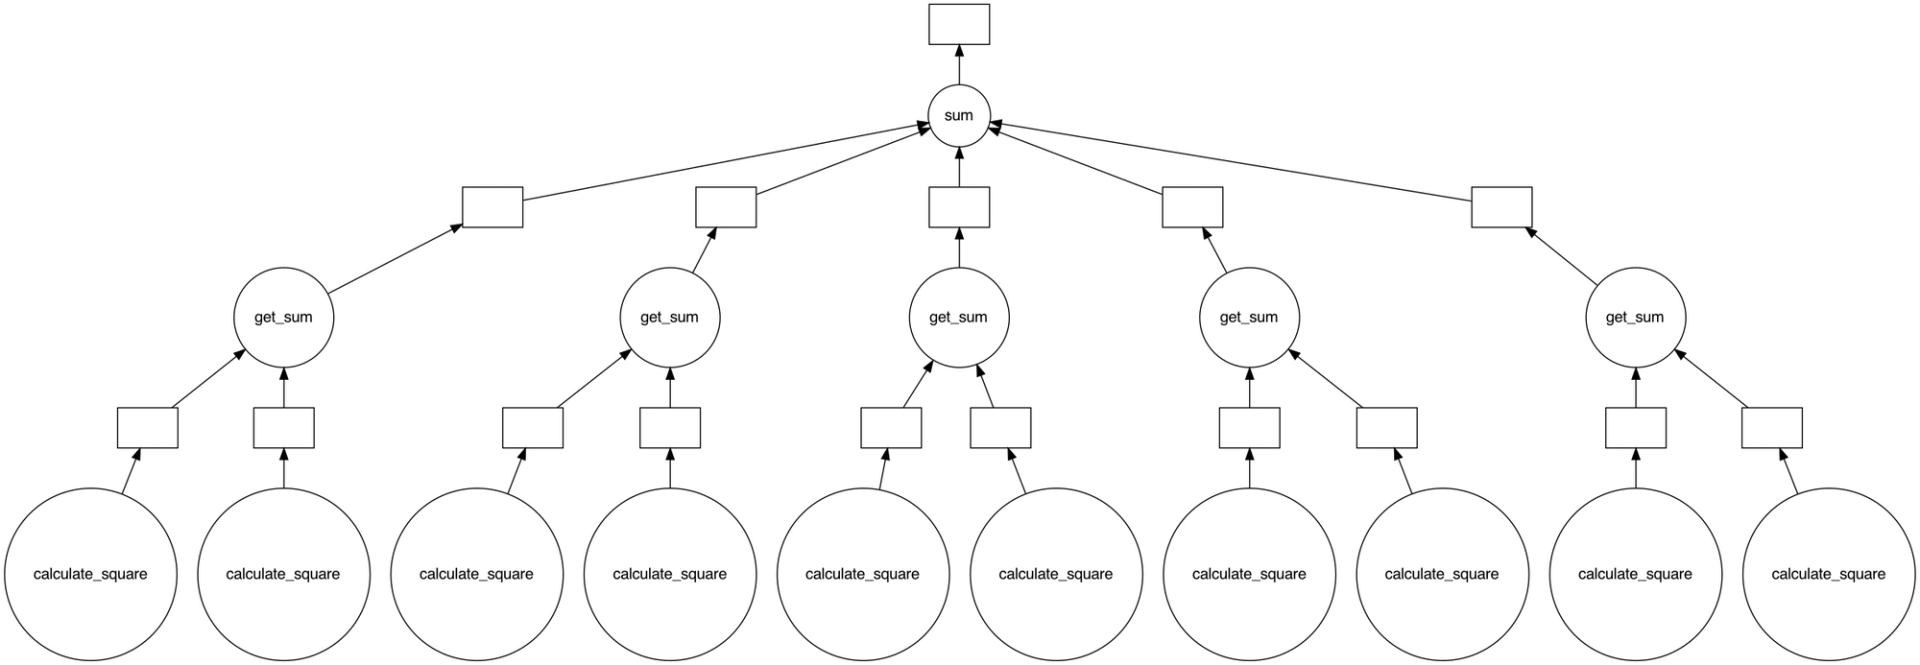
Here, the code iterates a for-loop and calculates the squared sum of two values, a and b, using the delayed method. The output of this code would be a graph with multiple branches, and it would look something like this:

So far, you’ve looked at the differences between pandas DataFrames and Dask DataFrames. However, the theory is not enough when you’re working on parallelization. Now you need to review the technical implementation, how Dask DataFrames work in practice, and how they compare to pandas DataFrames.
The sample data set used here can be downloaded from this GitHub repo.
Technical implementation
To begin testing the technical implementation of a Dask DataFrame, run the following code:
## import dependencies
import pandas as pd
import dask.dataframe as dd
## read the dataframe
pandas_dataframe = pd.read_csv('Sunspots.csv')
dask_dataframe = dd.read_csv('Sunspots.csv')
## calculate mean of a column
print(pandas_dataframe['Monthly Mean Total Sunspot Number'].mean())
print(dask_dataframe['Monthly Mean Total Sunspot Number'].mean().compute())
This code should produce the same result for both pandas and Dask DataFrames; however, the internal processing is quite different. A pandas DataFrame will be loaded in the memory, and you can only operate on it if it fits into the memory. If it doesn’t fit, an error will be thrown.
In contrast, Dask creates multiple pandas DataFrames and stores them on a disk if the available amount of memory is insufficient. When you call any operation on a Dask DataFrame, it’s applied to all the DataFrames that constitute a Dask DataFrame.
Besides the delayed method, Dask offers several other features like parallel and distributed execution, efficient data storage, and lazy execution. You can read about it in Dask’s official documentation.
Best practices for using Dask
Every tool or technology that makes development easier has some of its own defined rules and best practices for use, including Dask. These best practices can help make you more efficient and allow you to focus on development. Some of the most notable best practices for Dask include the following:
Start with the basics
You don’t always need to use parallel execution or distributed computing to find solutions to your problems. It’s best to start with normal execution, and if that doesn’t work, you can move on to other solutions.
Dashboard is the key
When you’re working on multiprocessing or multithreading concepts, you know that things are happening but you don’t really know how. The Dask dashboard helps you see the state of your workers and allows you to take the appropriate actions for the execution by providing a clear visualization.
Use storage efficiently
Even though Dask works with parallel execution, you shouldn’t be storing all your data in big files. You must manage your operations based on the available memory space; otherwise, you’ll run out of memory, or there will be a lag in the process.
These are just a few best practices to help make your development journey easier. Other recommendations include:
- Avoid very large partitions: so that they fit in a worker’s available memory.
- Avoid very large graphs: because that can create an overhead on tasks.
- Learn techniques for customization: in order to improve the efficiency of your processes.
- Stop using Dask when no longer needed: like when you are iterating on a much smaller amount of data.
- Persist in distributed RAM when you can: in doing so, accessing RAM memory will be faster.
- Processes and threads: be careful to separate numeric work from text data to maintain efficiency.
- Load data with Dask: for instance, if you need to work with large Python objects, let Dask create them (instead of creating them outside of Dask and then handing them over to the framework).
- Avoid calling compute repeatedly: as this can lower performance.
For more information, check out the Dask Best Practices article.
Using Dask with Domino
Domino Data Lab helps you dynamically provision and orchestrate a Dask cluster on the Domino instance’s infrastructure. This enables Domino users to quickly access Dask without relying on their IT team to set up and manage a cluster for them.
When you start a Domino workspace for interactive work or a Domino job for batch processing, Domino creates, manages, and makes a containerized Dask cluster available for your execution.
For more information on using Dask with Domino, check out our GitHub page.
Dask: a one-stop solution for parallelism, wasted hardware, and memory issues
Earlier programmers, developers, and data scientists didn’t have powerful systems to develop ML or data science solutions. But now, with powerful hardware and regular improvements, these solutions are becoming increasingly popular. However, this poses a problem: data libraries aren’t designed to make use of these solutions because they don’t have the memory capacity or can’t make use of the computational power.
With Dask, you don’t have to worry about parallelism, hardware getting wasted, or memory issues. Dask is a one-stop solution for all these issues.
When you begin building a solution (keeping memory issues or computation power in mind), you need to deploy the solution somewhere where it’s accessible to the intended audience. The Domino Enterprise MLOps platform accelerates the development and deployment of data science work by providing the machine learning tools, infrastructure, and work materials, making it easy for teams to coordinate and build solutions.
Gourav is an Applied Machine Learning Engineer at ValueMomentum Inc. His focus is in developing Machine Learning/Deep learning pipelines, retraining systems, and transforming Data Science prototypes to production-grade solutions. He has consulted for a wide array of Fortune 500 Companies, which has provided him the exposure to write about his experience and skills that can contribute to the Machine Learning Community.


